Last Updated on September 20, 2023 by Sabrina Currie
If you're a fan of sourdough bread, then this guide from a sourdough pro on how to make delicious vegan buckwheat sourdough bread is for you! Rich, nutty and earthy buckwheat sourdough is the perfect recipe for fall and winter. And check out the fun and festive variations to too!

This is guest post from Master sourdough baker, Tina, from Stretch And Folds. She makes amazing sourdough recipes from breads to crackers and lots of sourdough discard recipes too. Thanks Tina, for this delicious, hearty recipe with amazing sourdough tips!
Jump to:
- Why Make Buckwheat Sourdough Bread
- The Science Behind It
- Ingredients
- How To Make Buckwheat Sourdough Bread - Step By Step
- Expert Bread Making Tip
- Tips For Softer, Fluffier Loaves Of Bread
- Variations & Add-ins
- Tools You'll Need
- Crucial Success Tip
- Storage
- FAQ's
- Related Recipes
- Pin It To Save For Later
- 📖 Recipe
- 💬 Community
Why Make Buckwheat Sourdough Bread
Buckwheat sourdough bread offers a unique and wholesome twist to your usual sourdough loaf. While buckwheat flour can be tough to work with, the result is definitely worth it. Buckwheat sourdough bread has an earthy flavor with a nutty note and a mild sourdough tang from the natural fermentation process. (Love vegan baking? Check out the 50 best vegan Christmas cookies and these tender, vegan lemon poppy seed muffins.)
The Science Behind It
Lucky for you, I did extensive testing to find out what the perfect ratio of buckwheat flour to bread flour is. Many flat loaves were baked in the process.
Using 11% of buckwheat flour in this particular recipe doesn't seem much at first glance. But since buckwheat groats don't contain any gluten (yes, buckwheat flour is naturally gluten-free flour!), it is necessary to use a combination of buckwheat flour and bread flour. Bread flour provides gluten and gives the bread structure, which results in that nice crumb we all strive for.
(Below are the loaves with a higher percentage of buckwheat flour. If you think you'd like to use more than 10-15%, be prepared for a much more dense loaf.)
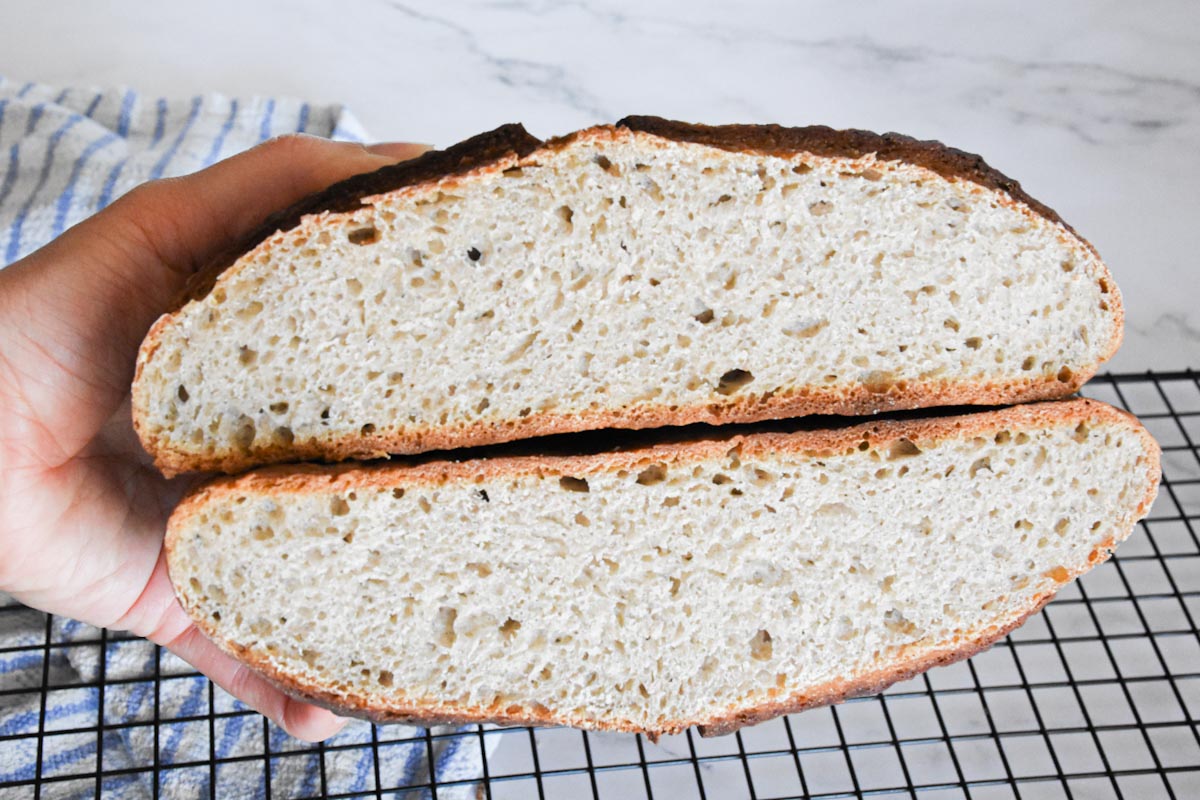
After many failed attempts to get the ratio just right, THIS recipe hits the sweet spot. The amount of whole buckwheat flour gives it a nice, strong flavor, but the texture is still somewhat similar to your usual sourdough loaf, thanks to the high percentage of gluten in bread flour. Below is the finished vegan bread using 11% buckwheat flour. Note the difference in height between the loaves.

If you like your bread very flavorful and nutty (think rye bread, pumpernickel, or any low-gluten bread using high amounts of millet flour, sorghum flour, or oat flour), this bread has a good chance to become your new favorite!
Ingredients
With just 4 ingredients plus water, this buckwheat sourdough bread is easy to make anytime.

- Active sourdough starter - You don't need to make a buckwheat starter for this recipe,
since we are not trying to bake gluten-free bread that requires gluten-free sourdough
starter as well. As long as your starter is active and doubles anywhere from 4-24 hours,
you are good to go. Other than your starter, we'll only be using simple ingredients. If you don't have your own sourdough starter yet, learn how to make your own sourdough starter! - Water: If your tap water is safe to drink and doesn't contain high amounts of chloride, it's okay to use it in this recipe. If not, use filtered water.
- Bread flour (or "Manitoba" flour): You can substitute bread flour with all purpose flour but be prepared for the bread to be a little denser and flatter. The flavor will still be fantastic though!
- Whole grain buckwheat flour: If you are going after the taste of buckwheat, use whole grain buckwheat flour for best results. If you prefer your bread to have a milder taste, use regular buckwheat flour. In this case, use a bit less water, since regular buckwheat flour doesn't absorb quite as much as whole grain does.
- Salt: salt plays a role in gluten development and hydration of the dough, so don't skip it just because you think you can't taste it!
How To Make Buckwheat Sourdough Bread - Step By Step
Don't be daunted by the long explanation if you're new to sourdough making. It's mostly just stirring, resting, stretching and folding aka kneading, resting more and then baking. Easy, right?!

Step 1. Mix your water, starter, and salt in a large bowl. I like mixing those up first so the starter and the salt have a chance to disperse in the water. Add your dry ingredients: the bread flour and the whole grain buckwheat flour.

Step 2. Mix well with a spoon. It's normal for the dough to appear very dry at first, even though it is a medium hydration dough. Start to knead it just a little so it comes together and forms a ball (see photo above). If the dough still doesn't come together after kneading it, increase the amount of water just a little.

Step 3. Let the dough rest for about 30 minutes. After 30 minutes, do a set of stretch and folds. That means that you grab the edge of the dough, stretch it up, and fold it under on the other side.
Rotate your bowl for 90 degrees and repeat 3 more times. This is one set of stretch and folds. We're going to do 4-6 sets of stretch and folds in total over a (roughly) 2-hour period. If you manage to make 6 sets, great! If you only find time for 4, you'll be just fine.

Step 4. After you complete your sets of stretch and folds, cover your dough with a wet kitchen towel or a plastic bag (I prefer the latter). Let the dough rise, but don't wait for it to double in volume. I suggest you do a bulk fermentation for 4 - 6 hours at room temperature and in that time, the dough should get about 75% bigger in volume. Whether that's going to be closer to 4 hours or closer to 6 hours depends mainly on the temperature of your kitchen. A good indicator that the wild yeast is doing its job is the bubbles on top of the dough.

Step 5. After the bulk ferment, prepare your proofing basket (either a banneton basket or some other kind of basket), and line it with a clean tea towel. Sprinkle a little bit of flour on it to prevent the dough from sticking. Transfer your dough from a mixing bowl to a lightly floured work surface and shape it. The way to do that is to grab the opposite ends of the dough and pinch them together on top. Repeat with the other two opposites.
Carefully transfer your dough ball into a tea towel-lined basket. The pinched parts should be facing upwards. Cover your dough with something airtight; I like to put the banneton basket in a plastic bag and tie it well. Put it in the fridge for 12 - 24 hours. If you like to let your dough ferment longer, you can go up to 48 hours.
Step 6. The next day, when you're ready to bake the bread, preheat the oven to 460°F, with the Dutch oven and lid in it.
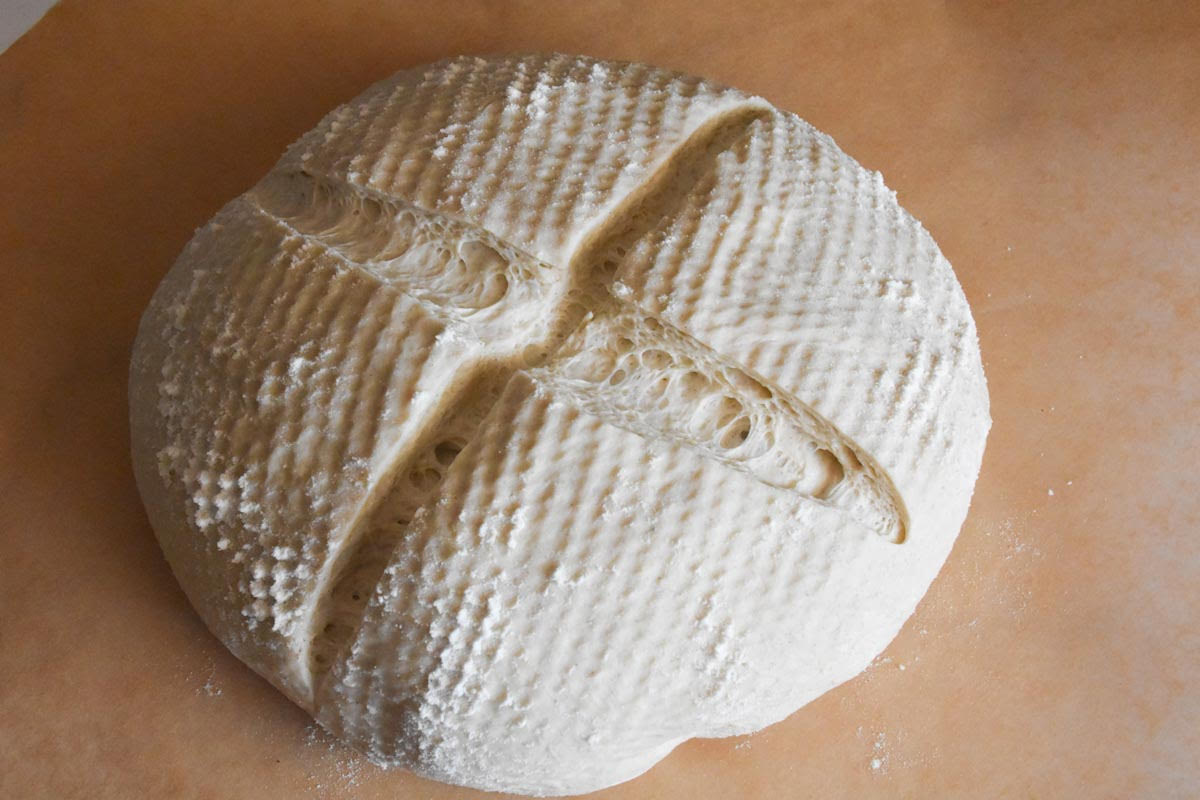
Transfer your dough from the basket to the piece of parchment paper, so the floured bottom of the dough is now the top of the dough. Score your dough with a razor blade or a sharp knife; make two deep cuts so you get a crisis cross pattern.
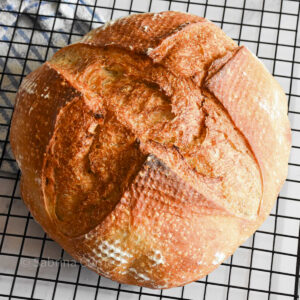
Transfer your parchment paper with a dough on it into the hot Dutch oven. Splash just a bit of water between the parchment paper and Dutch oven to create some steam and place the lid on quickly to capture the steam inside. Put the bread in the oven for 25 minutes at 460°F (238°C). Take the lid off and bake for an additional 8 minutes with the lid off at 440°F (227°C) to get that golden brown color.

After taking the bread out of the oven, put it on a cooling rack, and cover it with a damp kitchen towel. Let the bread cool for at least an hour before you slice it.
Expert Bread Making Tip
Don't stress too much about it. Sourdough recipes are sometimes really particular about what to do and when to do it. When in reality, it's a very forgiving process and it depends on a lot of factors, not just how often you stretch and fold your dough. Enjoy the meditative process of making this delicious, vegan buckwheat sourdough bread.
Tips For Softer, Fluffier Loaves Of Bread
If you like your bread to have a nice open crumb and softer texture, I suggest you lower your buckwheat flour percentage from 11% to 8-10%. That way, you're bread will still have a mild taste of buckwheat, but will closely resemble 100% wheat bread in texture. Just for reference: "buckwheat bread" from the grocery store often has less than 10% buckwheat flour in it, so it can still be fluffy and soft.

Variations & Add-ins
It is a good idea to make any bread you bake just a bit different once in awhile, to ensure you or your family doesn't get tired of it. You can enhance its flavor and looks in the following ways:
● Add walnuts: buckwheat and walnuts have a reputation for fitting well together.
Especially in Eastern European countries, buckwheat bread most often has walnuts
added to it.
● Add sprouted buckwheat groats - they add a wonderful texture to the bread and most importantly, they add a certain sweetness. They are probably my favorite addition, but they demand some extra time to prepare them.
● Add cranberries (and walnuts) - cranberries give your bread a pop of color and
compliment the buckwheat flavor incredibly well! The red color and rich flavors give the bread a Christmassy vibe in my opinion, so this variation is perfect for winter holidays!
Tools You'll Need
You'll NEED a Dutch oven if you want perfect results for this recipe. Dutch ovens are awesome at creating a lot of steam when the bread bakes, which results in a better oven spring and better moisture retention. (See my no-knead bread in a Dutch oven)

You can go of course ahead and "open bake" your bread (meaning you bake it without the Dutch oven). It will still turn out fine and tasty, but using a Dutch oven will yield even better results.
Other than that, you don't need any special equipment. No stand mixer, food processor, or even bread pan is required.
Crucial Success Tip
For best results, wet your fingers with water to prevent the dough from sticking to your hands when you handle the dough. Use this tip especially when doing the sets of stretch and folds. It is normal for the dough to be a bit sticky the first time you do stretch and folds. The more you do, the less sticky it becomes.
Storage
Although buckwheat sourdough bread can last up to a week at room temperature, it's best to eat it within the first three days. Best ways to store it are:
- Wrap in Cloth or Paper: Wrap the cooled bread in a clean cloth or paper bag. This
allows the bread to breathe slightly and helps maintain its crust's texture. - Avoid Plastic Bags: Avoid storing the bread in plastic bags unless you're freezing it. Plastic bags can trap moisture and adversely affect your delicious sourdough loaf.
and make the crust soft. However, if you want to keep the crust softer for a longer time, you can use a plastic bag but leave it open or puncture a few holes in it. - Bread Box: If you have a bread box, it can be an excellent option for storing your buckwheat bread. A bread box provides a slightly humid environment that can help keep this vegan bread's crust from becoming too hard.
- Freeze: After three days, consider freezing it. If it goes stale before you have a chance to eat or freeze it, you can always turn it into buckwheat bread pudding, stuffing, breadcrumbs, etc.

FAQ's
Buckwheat sourdough can be a delightful choice if you appreciate its unique flavor and texture. Buckwheat's taste is often described as nutty and earthy, with a subtle sour note, making it a suitable complement to the tangy qualities of sourdough fermentation.
You can absolutely use buckwheat flour to make a sourdough starter. Buckwheat flour is a gluten-free option, making it an ideal choice for making a sourdough starter suitable for people with gluten sensitivities or celiac disease. I never attempted to create one with buckwheat flour, but I have fed my starter a bit of buckwheat flour from time to time if I was low on wheat or rye flour.
Buckwheat flour lacks gluten, so bread made solely from buckwheat flour can be denser. However, it's a nutritious choice, rich in essential amino acids and minerals. It's a great gluten-free option and can be used in sourdough starters to add a pleasant sour flavor.
This question is open for debate since even health professionals sometimes don't agree on what nutrients are the most important ones. But rye, spelt, and einkorn flour come up frequently as the most healthy and nutrient-dense flours. While there is no one-fits-all answer as to which flour is the healthiest, most experts agree you should probably include a variety of different foods into your diet to get as many different nutrients as possible. If we apply the same principle to bread (and I think we can), use different kinds of flour when you bake your bread. That way, you'll ensure you get a variety of different nutrients from it.
Related Recipes
In the mood for baking? Try these delicious treats.
- Non-Candy Halloween Treats And Ideas Kids Will Love
- Easy Cherry Muffins With A Quick Sugar Crunch Topping
- Easy Homemade Raspberry Ice Cream With Fresh Berries
- Easy Apple Crumble Tartlets With Just 8 Ingredients


Pin It To Save For Later
Save this buckwheat sourdough bread recipe to Pinterest or Facebook or bookmark it in your browser for when you're ready to bake it!
If you have any questions or comments, you can find me on Instagram, Pinterest and Facebook. I try to answer any recipe related questions quickly as I know you might be in the middle of making it.
Also check out my FREE PRINTABLE meal planner to make menu planning and grocery shopping a breeze and my shopping guide. And if you like this recipe, I would love it if you give it a star rating in the recipe card.
Cheers and happy cooking, Friends! Sabrina
📖 Recipe
How To Make Delicious Vegan Buckwheat Sourdough Bread
Ingredients
- 60 g sourdough starter about ¼ cup
- 320 g bread flour about 2 ½ cups
- 40 g whole-grain buckwheat flour about ¼ cup
- 225 g water about 1 cup
- 6 g salt about 1 teaspoon
Instructions
- Mix your water, starter, and salt in a large bowl. I like mixing those up first so the starter and the salt have a chance to disperse in the water. Add your dry ingredients: the bread flour and the whole grain buckwheat flour. Mix well with a spoon.
- It's normal for the dough to appear very dry at first, even though it is a medium hydration dough. Start to knead it just a little so it comes together and forms a ball (see photo above). If the dough still doesn't come together after kneading it, increase the amount of water just a little.
- Let the dough rest for about 30 minutes. After 30 minutes, do a set of stretch and folds. That means that you grab the edge of the dough, stretch it up, and fold it under on the other side.
- Rotate your bowl for 90 degrees and repeat 3 more times. This is one set of stretch and folds. We're going to do 4-6 sets of stretch and folds in total over a (roughly) 2-hour period. If you manage to make 6 sets, great! If you only find time for 4, you'll be just fine.
- Sourdough recipes are sometimes really particular about what to do and when to do it. When in reality, it's a very forgiving process and it depends on a lot of factors, not just how often you stretch and fold your dough. So don't stress too much about it.
- After you complete your sets of stretch and folds, cover your dough with a wet kitchen towel or a plastic bag (I prefer the latter). Let the dough rise, but don't wait for it to double in volume. I suggest you do a bulk fermentation for 4 - 6 hours at room temperature and in that time, the dough should get about 75% bigger in volume. Whether that's going to be closer to 4 hours or closer to 6 hours depends mainly on the temperature of your kitchen. A good indicator that the wild yeast is doing its job is the bubbles on top of the dough.
- After the bulk ferment, prepare your proofing basket (either a banneton basket or some other kind of basket), and line it with a clean tea towel. Sprinkle a little bit of flour on it to prevent the dough from sticking. Transfer your dough from a mixing bowl to a lightly floured work surface and shape it. The way to do that is to grab the opposite ends of the dough and pinch them together on top. Repeat with the other two opposites.
- Carefully transfer your dough ball into a tea towel-lined basket. The pinched parts should be facing upwards. Cover your dough with something airtight; I like to put the banneton basket in a plastic bag and tie it well. Put it in the fridge for 12 - 24 hours. If you like to let your dough ferment longer, you can go up to 48 hours.
- The next day, transfer your dough from the basket to the piece of parchment paper, so the floured bottom of the dough is now the top of the dough. Score your dough with a razor blade or a sharp knife; make two deep cuts so you get a crisis cross pattern.
- Transfer your parchment paper with a dough on it into a hot dutch oven. Splash just a bit of water between the parchment paper and dutch oven to create some steam and cover quickly to capture it inside. Put the bread in the oven for 25 minutes at 460°F (238°C). Take the lid off and bake for an additional 8 minutes with the lid off at 440°F (227°C) to get that golden brown color.
- After taking the bread out of the oven, put it on a cooling rack, and cover it with a damp kitchen towel. Let the bread cool for at least an hour before you


BERNADETTE says
Thanks for the recipe and the introduction to Tina.
Sabrina Currie says
You’re welcome. She has so many amazing sourdough recipes!